AWS Secrets Manager
You can use Phase to sync secrets to your AWS infrastructure via AWS Secrets Manager.
Prerequisites
- AWS CLI / AWS CloudShell
- An AWS account with permissions to create IAM users and attach policies
When secret syncing is enabled, secrets stored inside Phase will be treated as the source of truth. Any secrets on the target service will be overwritten or deleted. Please import your secrets into Phase before continuing. For guidance, see: Import secrets from AWS Secrets Manager
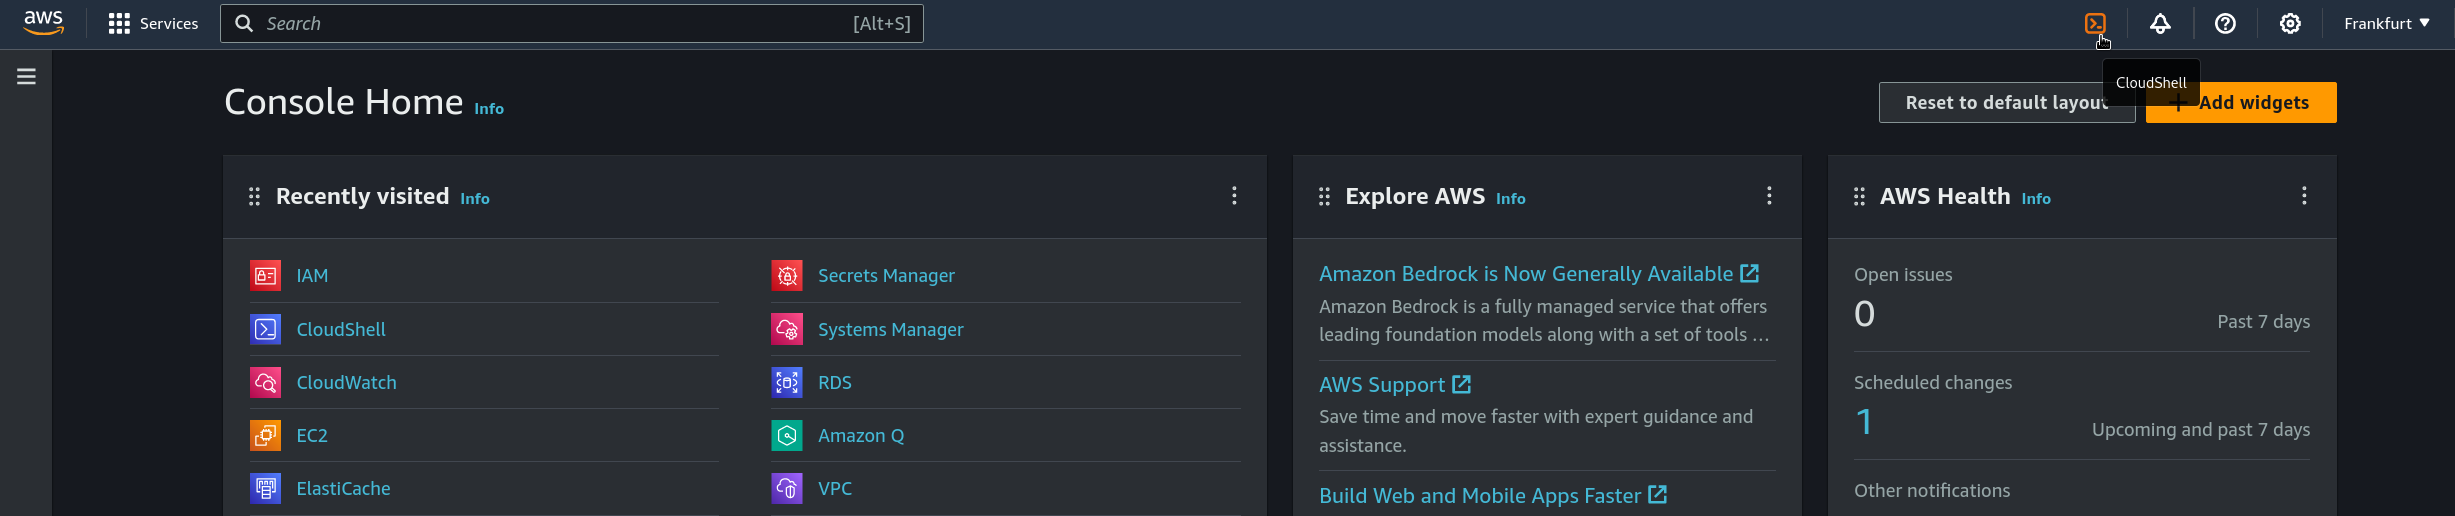
Note: If you don't have aws-cli installed locally on your system you can AWS CloudShell by logging in to your AWS Console and clicking the terminal icon in the top left.
AWS Authentication Setup
Choose your preferred method for authenticating Phase with AWS:
Phase Cloud
To allow Phase Cloud to securely access your AWS Secrets Manager, you need to set up an IAM Role in your AWS account. Phase Cloud will then assume this role using an External ID for added security. The setup involves creating an IAM policy with the necessary permissions, then creating an IAM role that trusts Phase's AWS entity and has this policy attached.
Step 1: Create IAM Policy for Secrets Manager Access (in your AWS account)
This policy grants Phase the specific permissions needed to manage secrets within your AWS Secrets Manager.
- Run the following AWS CLI command in your terminal. You can customize the policy name (e.g.,
phase-console-aws-secrets-manager-integration-policy):
aws iam create-policy --policy-name phase-console-aws-secrets-manager-integration-policy --policy-document '{
  "Version": "2012-10-17",
  "Statement": [
    {
      "Sid": "AllowSecretsManagerAccess",
      "Effect": "Allow",
      "Action": [
        "secretsmanager:GetSecretValue",
        "secretsmanager:DescribeSecret",
        "secretsmanager:PutSecretValue",
        "secretsmanager:ListSecrets",
        "secretsmanager:CreateSecret",
        "secretsmanager:DeleteSecret",
        "secretsmanager:TagResource",
        "secretsmanager:UpdateSecret"
      ],
      "Resource": "*"
    }
  ]
}'
- After running the command, AWS will return the policy details. Make a note of the Policy ARN (e.g.,
arn:aws:iam::YOUR_ACCOUNT_ID:policy/phase-console-aws-secrets-manager-integration-policy). You will need this ARN in Step 3.
Step 2: Obtain External ID from Phase Console
An External ID is a security measure that helps prevent the "confused deputy" problem. You'll generate this in the Phase Console.
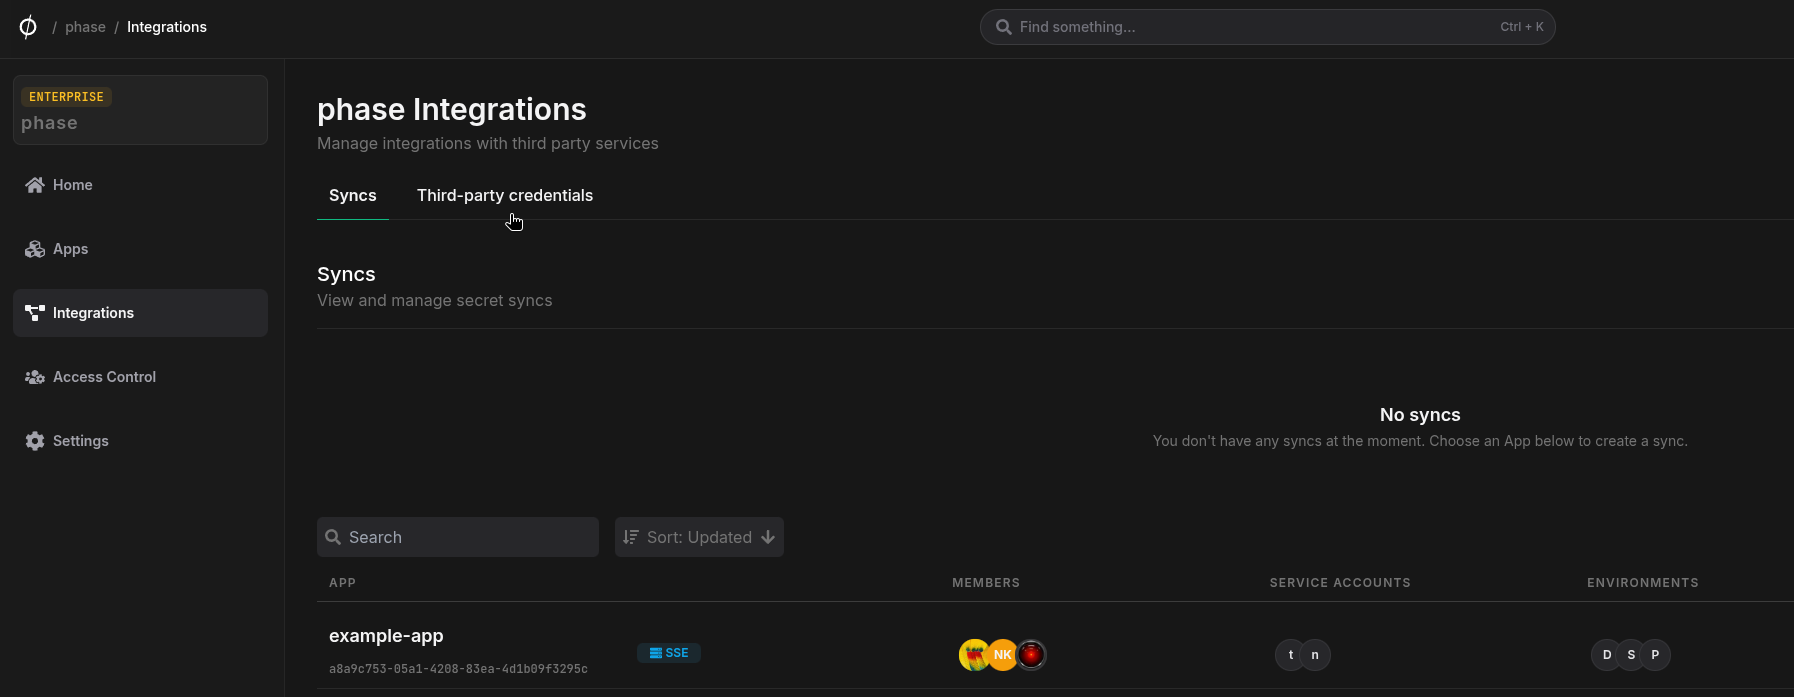
- In the Phase Console, navigate to Integrations (from the sidebar) > Third-party credentials.
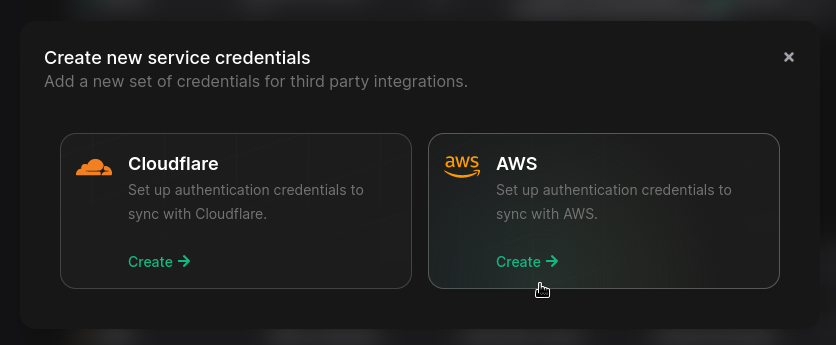
- Click on AWS to create new AWS credentials.
- Select the Assume Role tab.
- You will see a field for EXTERNAL ID (Optional). Click the Generate button next to it, as shown in the UI below.
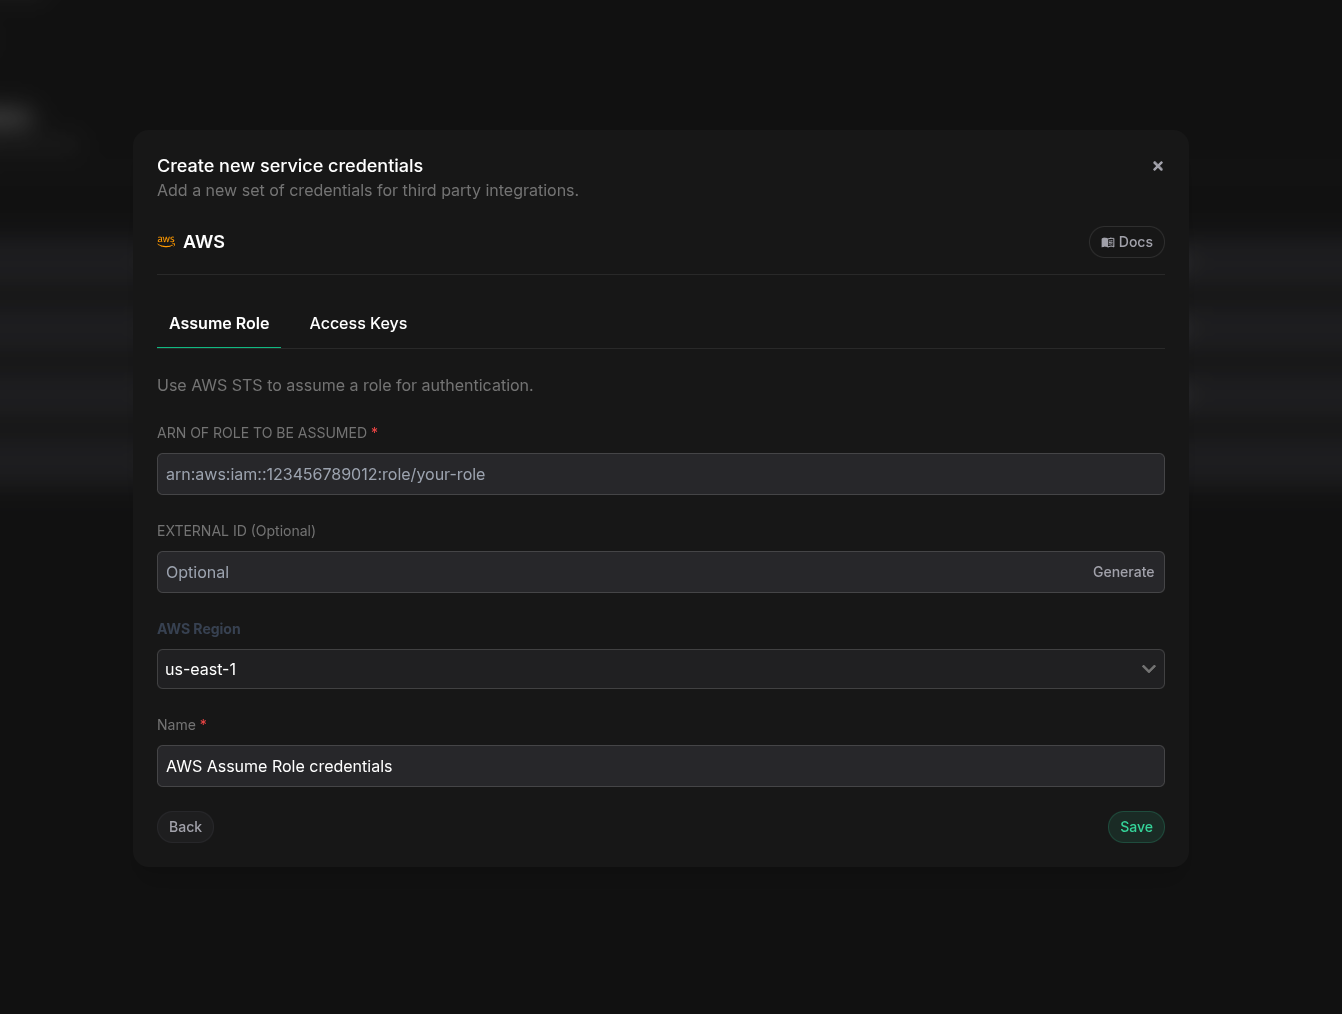
- Copy the generated External ID. You will need this for the trust policy of the IAM role in the next step. Keep this ID secure.
Step 3: Create IAM Role (in your AWS account)
This role will be assumed by Phase Cloud. It needs to trust Phase's AWS role and have the Secrets Manager access policy attached.
- Prepare the trust policy JSON. Create a file named
phase-cloud-trust-policy.jsonwith the following content.- Replace
YOUR_PHASE_GENERATED_EXTERNAL_IDwith the External ID you copied from the Phase Console in Step 2. - The
Principal.AWSvaluearn:aws:iam::499502749186:role/PhaseIntegrationTrustAnchoris Phase's designated role ARN that will assume this role.
- Replace
{
  "Version": "2012-10-17",
  "Statement": [
    {
      "Effect": "Allow",
      "Principal": {
        "AWS": "arn:aws:iam::499502749186:role/PhaseIntegrationTrustAnchor"
      },
      "Action": "sts:AssumeRole",
      "Condition": {
        "StringEquals": {
          "sts:ExternalId": "YOUR_PHASE_GENERATED_EXTERNAL_ID"
        }
      }
    }
  ]
}
Alternatively, if you are using the AWS Console to create this role, please select the Custom trust policy option when selecting the trusted entity and paste the following JSON:
- Run the following AWS CLI command to create the IAM role. You can customize the role name (e.g.,
phase-console-aws-secrets-manager-integration):
aws iam create-role --role-name phase-console-aws-secrets-manager-integration --assume-role-policy-document phase-cloud-trust-policy.json
-
After the role is created, AWS will return its details. Make a note of the Role ARN (e.g.,
arn:aws:iam::YOUR_ACCOUNT_ID:role/phase-console-aws-secrets-manager-integration). This is the ARN you will provide to Phase. -
Attach the Secrets Manager access policy (created in Step 1) to this new role.
- Replace
phase-console-aws-secrets-manager-integrationwith your chosen role name if different. - Replace
YOUR_POLICY_ARN_FROM_STEP_1with the Policy ARN you noted earlier.
- Replace
aws iam attach-role-policy --role-name phase-console-aws-secrets-manager-integration --policy-arn YOUR_POLICY_ARN_FROM_STEP_1
Step 4: Configure Credentials in Phase Console
- Return to the Phase Console where you generated the External ID (Integrations > Third-party credentials > AWS > Assume Role).
- In the ARN OF ROLE TO BE ASSUMED field, paste the Role ARN of the
phase-console-aws-secrets-manager-integration(or your custom name) that you just created in your AWS account (from Step 3.3). - The EXTERNAL ID field should already contain the ID you generated in Step 2. Verify it.
- Select the appropriate AWS Region where your Secrets Manager secrets are or will be stored.
- Provide a descriptive Name for these credentials in Phase (e.g., "AWS Secrets Manager Assume role integration credentials").
- Click Save.
Phase is now configured to securely access your AWS Secrets Manager using the Assume Role method.
Self-hosted Phase
Please make sure to have set-up the AWS integration for your self-hosted Phase instance. This setup provides the primary IAM Role or User that Phase will use to assume other roles, including the one we are about to create for Secrets Manager access.
To allow your self-hosted Phase instance to securely access AWS Secrets Manager, you need to create a dedicated IAM Role in your AWS account. This role will have permissions to manage secrets in Secrets Manager and will trust the primary IAM principal (Role or User) already configured for your Phase instance.
Step 1: Create IAM Policy for Secrets Manager Access
This policy grants Phase the specific permissions needed to manage secrets within your AWS Secrets Manager. If you've already created a similar policy, you can adapt or reuse it.
- Define the policy document. Create a file named
phase-sm-policy.jsonwith the following content:
{
  "Version": "2012-10-17",
  "Statement": [
    {
      "Sid": "AllowSecretsManagerAccess",
      "Effect": "Allow",
      "Action": [
        "secretsmanager:GetSecretValue",
        "secretsmanager:DescribeSecret",
        "secretsmanager:PutSecretValue",
        "secretsmanager:ListSecrets",
        "secretsmanager:CreateSecret",
        "secretsmanager:DeleteSecret",
        "secretsmanager:TagResource",
        "secretsmanager:UpdateSecret"
      ],
      "Resource": "*"
    }
  ]
}
- Run the following AWS CLI command to create the policy. You can customize the policy name (e.g.,
phase-console-aws-secrets-manager-integration-policy):
aws iam create-policy \
  --policy-name phase-console-aws-secrets-manager-integration-policy \
  --policy-document file://phase-sm-policy.json
- After running the command, AWS will return the policy details. Make a note of the Policy ARN (e.g.,
arn:aws:iam::YOUR_ACCOUNT_ID:policy/phase-console-aws-secrets-manager-integration-policy). You will need this ARN in Step 2.
Step 2: Create IAM Role for Secrets Manager Access
This role will be assumed by your Phase instance's primary AWS integration principal. It needs the Secrets Manager access policy (created in Step 1) attached.
-
Prepare the trust policy JSON. The trust policy must allow your self-hosted Phase instance's primary AWS IAM principal to assume this role. This principal is the IAM Role or User that you configured when setting up the AWS integration for your self-hosted Phase instance.
Create a file named
phase-sm-trust-policy.jsonwith the following content. You will need to replace"<ARN_OF_YOUR_PHASE_INTEGRATION_PRINCIPAL>"with the actual ARN of the IAM role or user that your self-hosted Phase instance uses.- If your Phase instance uses IMDSv2 (EC2 Instance Profile Role), the ARN will be like
arn:aws:iam::YOUR_ACCOUNT_ID:role/PhaseEC2InstanceRole. Refer to the IMDS setup guide for your specific role name. - If your Phase instance uses Kubernetes IRSA (IAM Role for Service Account), the ARN will be like
arn:aws:iam::YOUR_ACCOUNT_ID:role/PhaseGlobalAssumeRoleEKS. Refer to the IRSA setup guide for your specific role name. - If your Phase instance uses Access Keys (IAM User), the ARN will be like
arn:aws:iam::YOUR_ACCOUNT_ID:user/phase-integration-user. Refer to the Access Keys setup guide for your specific user name.
- If your Phase instance uses IMDSv2 (EC2 Instance Profile Role), the ARN will be like
{
  "Version": "2012-10-17",
  "Statement": [
    {
      "Effect": "Allow",
      "Principal": {
        "AWS": "<ARN_OF_YOUR_PHASE_INTEGRATION_PRINCIPAL>"
      },
      "Action": "sts:AssumeRole"
    }
  ]
}
- Run the following AWS CLI command to create the IAM role. You can customize the role name (e.g.,
phase-console-aws-secrets-manager-integration-policy):
aws iam create-role \
  --role-name phase-console-aws-secrets-manager-integration-policy \
  --assume-role-policy-document file://phase-sm-trust-policy.json \
  --description "IAM role for self-hosted Phase to access Secrets Manager"
-
After the role is created, AWS will return its details. Make a note of the Role ARN (e.g.,
arn:aws:iam::YOUR_ACCOUNT_ID:role/phase-console-aws-secrets-manager-integration-policy). This is the ARN you will provide to your Phase Console. -
Attach the Secrets Manager access policy (created in Step 1) to this new role.
- Replace
phase-console-aws-secrets-manager-integration-policywith your chosen role name if different. - Replace
YOUR_POLICY_ARN_FROM_STEP_1with the Policy ARN you noted earlier.
- Replace
aws iam attach-role-policy \
  --role-name phase-console-aws-secrets-manager-integration-policy \
  --policy-arn YOUR_POLICY_ARN_FROM_STEP_1
Step 3: Configure Credentials in Phase
- In your Phase Console, navigate to Integrations (from the sidebar) > Third-party credentials.
- Click on Add credentials, select AWS to create new AWS credentials (or edit existing ones if appropriate).
- Select the Assume Role tab.
- In the ARN OF ROLE TO BE ASSUMED field, paste the Role ARN of the
phase-console-aws-secrets-manager-integration-policy(or your custom name) that you just created (from Step 2.3). - The EXTERNAL ID field can be left blank. If you using a different AWS account than the one with the integration user, you can generate an External ID in the Phase Console.
- Select the appropriate AWS Region where your Secrets Manager secrets are or will be stored.
- Provide a descriptive Name for these credentials in Phase (e.g., "AWS Secrets Manager Self-Hosted Integration").
- Click Save.
Optional: Import existing secrets from AWS Secrets Manager in Phase
- List secrets
aws secretsmanager list-secrets
Example output:
{
  "SecretList": [
    {
      "ARN": "arn:aws:secretsmanager:eu-central-1:012345678910:secret:demo-secret-meQFRh",
      "Name": "demo-secret",
      "LastChangedDate": "2024-01-04T07:55:01+00:00",
      "LastAccessedDate": "2024-01-04T07:55:01+00:00",
      "SecretVersionsToStages": {
        "ade6d1a4-5bf8-4759-8d07-65c83e3601c8": ["AWSPREVIOUS"],
        "edb1bc97-69b9-485c-9a26-571a4825b69f": ["AWSCURRENT"]
      },
      "CreatedDate": "2024-01-04T07:55:01+00:00"
    }
  ]
}
- Export secrets to a
.envfile
aws secretsmanager get-secret-value --secret-id demo-secret | \
jq -r '.SecretString | fromjson | to_entries | map("\(.key)=\(.value|tostring)")[]' > .env
Example output:
head .env
SECRET_KEY_1=dummy_value_1
SECRET_KEY_2=dummy_value_2
SECRET_KEY_3=dummy_value_3
SECRET_KEY_4=dummy_value_4
SECRET_KEY_5=dummy_value_5
SECRET_KEY_6=dummy_value_6
SECRET_KEY_7=dummy_value_7
SECRET_KEY_8=dummy_value_8
SECRET_KEY_9=dummy_value_9
SECRET_KEY_10=dummy_value_10
- Import secret in Phase via the
phase-cli
phase secrets import .env --env development
- Delete the
.envfile.
rm .env
Advanced: Encrypt secrets in AWS Secrets Manager with AWS KMS customer managed keys (CMK)
AWS secrets manager encrypts all secrets stored in it via keys owned and managed by AWS (Encryption key: alias/aws/secretsmanager). For security and compliance reasons you may want to use your own keys to encrypt secrets.
Phase Console supports syncing secrets to AWS Secrets Manager and encrypting
them via a customer managed (CMK) Symmetric key with SYMMETRIC_DEFAULT key
spec.
- Get the AWS KMS CMK key ARN
aws kms list-keys
- Create an IAM policy that allows Phase to Encrypt secrets with your key.
You can use the following IAM policy template while creating IAM user credentials:
{
  "Version": "2012-10-17",
  "Statement": [
    {
      "Sid": "AllowSecretsManagerAccess",
      "Effect": "Allow",
      "Action": [
        "secretsmanager:GetSecretValue",
        "secretsmanager:DescribeSecret",
        "secretsmanager:ListSecrets",
        "secretsmanager:PutSecretValue",
        "secretsmanager:CreateSecret",
        "secretsmanager:DeleteSecret",
        "secretsmanager:TagResource",
        "secretsmanager:UpdateSecret"
      ],
      "Resource": "*"
    },
    {
      "Sid": "AllowKMSEncryption",
      "Effect": "Allow",
      "Action": [
        "kms:Encrypt",
        "kms:Decrypt",
        "kms:ReEncrypt*",
        "kms:GenerateDataKey*",
        "kms:DescribeKey"
      ],
      "Resource": "<ARN OF YOUR KMS CMK>"
    }
  ]
}
Sync Secrets from Phase
You can automatically sync secrets from your environments in your Phase App to a Secret in AWS Secrets Manager. You first need to setup credentials to use for the sync, and then choose a source and destination.
Step 1: Set up your AWS credentials in Phase
Your credentials are kept secure with robust application-layer encryption. Phase encrypts your credentials directly in the browser and only decrypts them in memory to perform sync operations. Your credentials are never stored in plaintext.
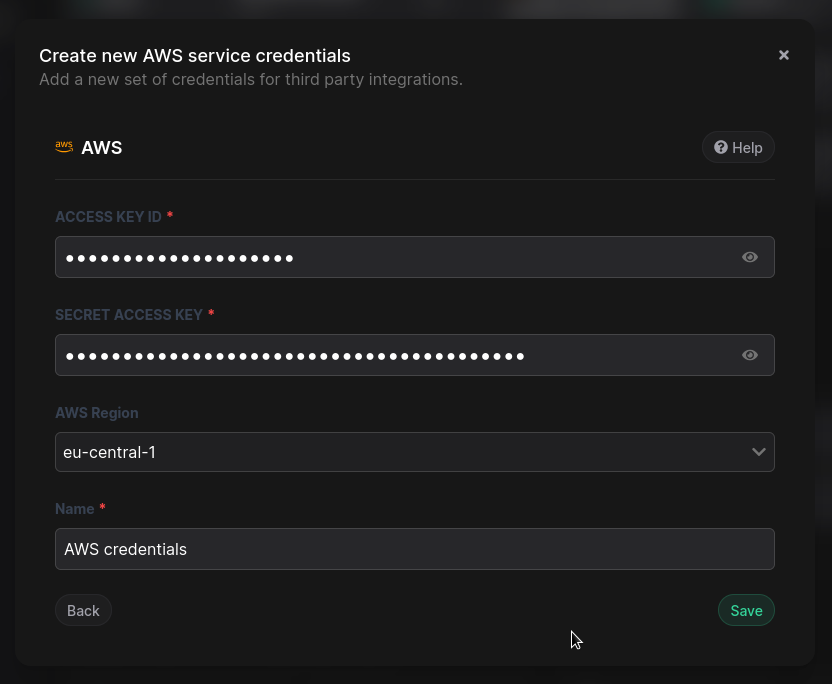
-
Create an
AccessKeyvia the AWS Console. See Step 5 for instructions on creating the key. Note theAccessKeyIdandSecretAccessKey. -
Go to Integrations from the sidebar and click on Third-party credentials in the integrations tab.
- Click on AWS
- Copy and paste your
AccessKeyIdandSecretAccessKeyfrom the AWS Console. Select the correct region code and add a descriptive name for these credentials. Click Save.
Step 2: Configure Sync
-
Enable Server-side Encryption (SSE) for the App from the Settings tab if not enabled already.
-
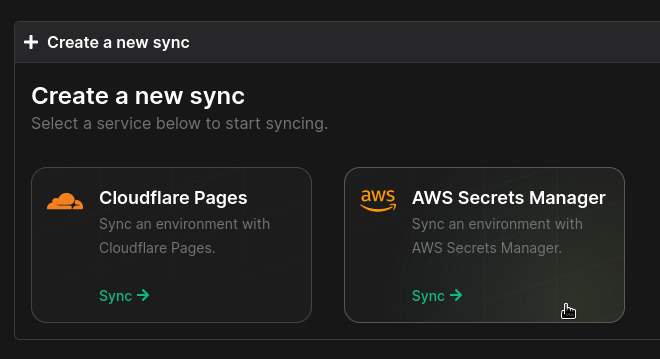
Go to your App in the Phase Console and go to the Syncing tab. Select AWS Secrets Manager under the 'Create a new Sync' menu.
- Select the credentials stored in the previous step as the authentication method for this sync, and click Next

If you see an error message and cannot proceed to the next screen, it is most
likely an issue with the AccessKeyId or SecretAccessKey. Verify that you
created the AWS credentials correctly and update them from the Integrations
screen if needed.
- Choose the source and destination to sync secrets. Select an Environment as the source for Secrets. Next, either enter a name for a new AWS Secret, or click on "Use existing AWS Secret" and select a Secret from the dropdown list.
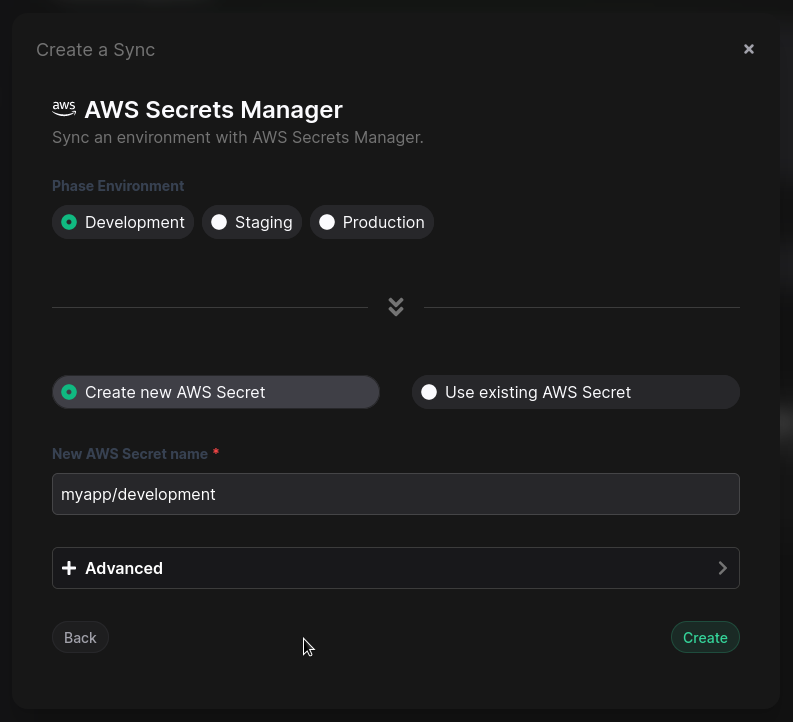
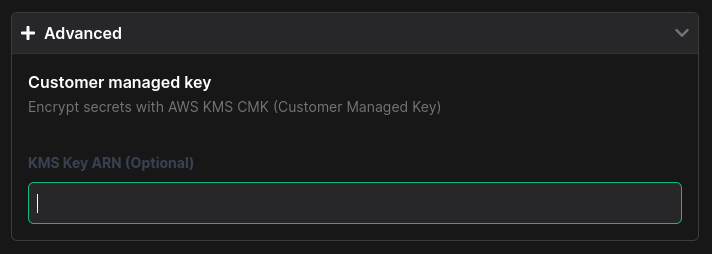
- (Optional) Use a Customer Manager Key (CMK) to encrypt secrets. If you would like to use an AWS KMS CMK to encrypt your AWS Secret, click on the Advanced pane to expand it, and paste the ARN of the key to use.
- Once you have selected your desired source and destination, click Create. The sync has been set up! Secrets will automatically be Synced from your chosen Phase Environment to the AWS Secret. You can click on the Manage button on the Sync card to view sync logs, pause syncing or update authentication credentials.
